Serverless Kafka Stream Processing with Ray
Learn how Ray can be paired with Apache Kafka to power streaming applications.
Data processing needs are far outpacing the development of faster hardware. This phenomenon, combined with a need for fault-tolerant infrastructure, has driven the transition from vertical scaling (one very powerful machine) to horizontal scaling (many conventional machines).
At the same time, in recent years we’ve seen a surge of applications that need to capture and react to events in real time. This has given rise to special data stores called event streaming platforms. These data stores often act as distributed logs that allow applications to produce and consume data in a horizontally scalable way. In many cases, applications that interact with stream processing platforms are performing what’s known as stream processing, that is, they consume events from one stream, process them (either individually or in aggregates), and then output to a different stream.
While the data store itself is distributed, it is also necessary to distribute the stream processing to keep up with the production rate of the source stream. This is not an easy task. As the rate of production can vary drastically, the number of workers processing the stream needs to increase and decrease over time. In most cases, this sizing is done manually. This results in suboptimal behavior because operators are likely to overprovision the stream processing cluster to be able to deal with peaks resulting in wasted resources. They also might be too slow to react if the peak is even higher than expected resulting in a bad user experience due to increased lag or crashes. This post explores how Ray, by means of Ray Clusters, can alleviate these issues by autoscaling to meet the demands of a stream processing job.
LinkOur stream processing application
A similar post showed how Ray and Ray Clusters can autoscale to meet the demands of a batch job to process images stored in a folder. In that example, Ray was able to determine the resources it needed, provision those resources, and assign them parts of the job to accelerate completion.
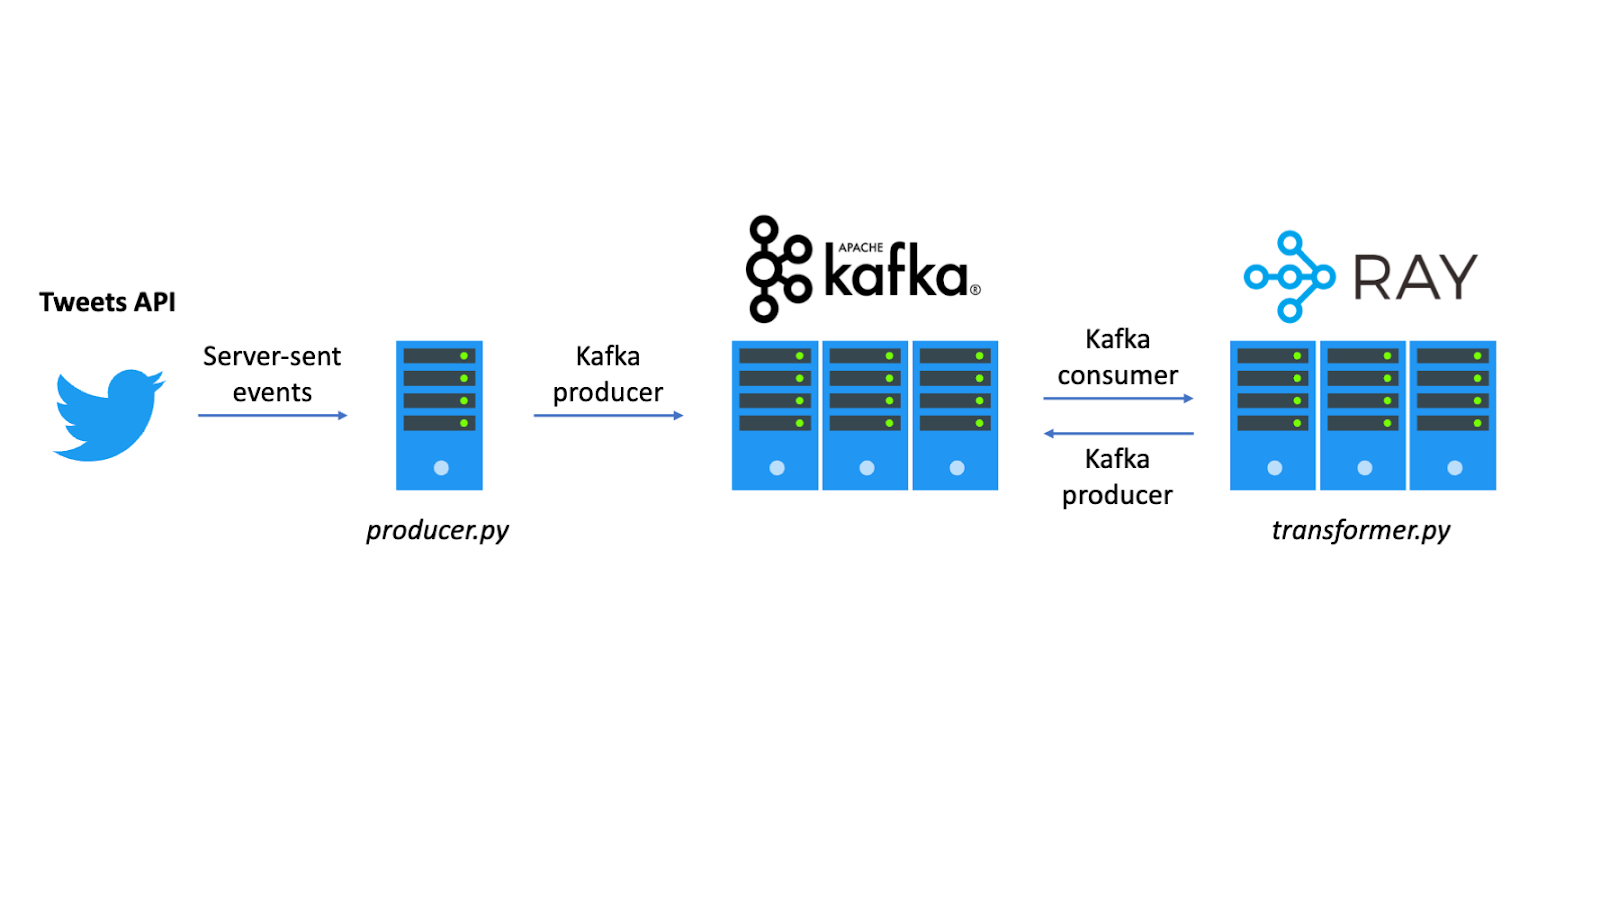 High-level architecture of our stream processing application
This post will demonstrate a similar workflow but in the context of stream processing using the highly popular, highly scalable Apache Kafka as the data store and Confluent’s Python client. Ray is used because it is able to adapt to the throughput requirements of a stream processing application without the need for an operator to specify the number of nodes needed to keep up with the pace of incoming new data. This effectively delivers a “serverless” experience where the developer doesn’t need to think about the underlying computational resources, since the application abstracts away the mechanisms that guarantee that resources are available when needed, but not wasted (Note: An important part of stream processing is high availability which Ray currently doesn’t have. However, there is an ongoing effort to support high availability for Ray’s Global Control Store).
The code for this demo is available on GitHub and it assumes that you have a working Kafka cluster available (for more information, refer to the Kafka quick start docs). The demo application works as follows:
It takes a Kafka topic containing URLs which point to images (consumption).
It extracts a color palette for each image (processing).
It outputs the palette to a second topic (production).
The initial topic containing URLs will contain data streamed from Twitter’s filtered tweets API as the source. Although this demo does not render the output (image palettes), an example of a rendering might look something like the image below.
 Example output from a palette extraction operation
LinkPreparing the source
In order to stream the source data, the first step is set up to access Twitter’s APIs. Sign in to Twitter’s developer portal. A Twitter account is required, but any existing regular Twitter account can be used for this purpose (or alternatively one can be created). Proceed then to create a new project and a new app within the project. At the end of the app creation, a bearer token that can be used to get access to Twitter’s filtered stream API will be revealed.
The filtered steam API will return all new tweets that match a preset filter. Since the application only has to process images, the filter will only include tweets containing pictures. Twitter’s API requires the filter to also contain stop words, so the filter will contain a few common words to make sure a sizable amount of images are streaming through the application. To start streaming the source data, run the following command (replace `YOUR_BEARER_TOKEN` with the bearer token that Twitter provided during the app creation):
1curl -X POST 'https://api.twitter.com/2/tweets/search/stream/rules' \
2  -H "Content-type: application/json" \
3  -H "Authorization: Bearer YOUR_BEARER_TOKEN" -d \
4    '{
5      "add": [
6        {"value": "plane OR car OR bird OR cat OR dog OR horse OR ship OR truck OR person OR twitter OR tweet OR post OR day OR night OR beach OR mountain OR house OR street has:images", "tag": "some images"}
7      ]
8    }'
9
The event stream can be consumed by a small application that accesses the Twitter feed over HTTP (server-sent events) and pushes the URLs to a Kafka topic called urls (replace `YOUR_BEARER_TOKEN` with the bearer token from Twitter and `YOUR_BOOTSTRAP_SERVERS` with the bootstrap server(s) for Kafka):
1from delivery_report import delivery_report
2import json
3import requests
4from confluent_kafka import Producer
5
6# Establish HTTP connection to Twitter event stream.
7headers = {
8  'Authorization': 'Bearer YOUR_BEARER_TOKEN'
9}
10params = {
11  'expansions': 'attachments.media_keys',
12  'media.fields': 'url'
13}
14r = requests.get(
15  'https://api.twitter.com/2/tweets/search/stream',
16  headers=headers,
17  params=params,
18  stream=True
19)
20tweets = r.iter_lines()
21
22# Set up Kafka producer.
23kafka = {
24  'connection': {'bootstrap.servers': 'YOUR_BOOTSTRAP_SERVER:PORT'},
25  'producer': {}
26}
27p = Producer({**kafka['connection'], **kafka['producer']})
28
29# Produce messages until the process is interrupted.
30try:
31  tweet = next(tweets)
32  if tweet:
33    t = json.loads(tweet.decode('utf-8'))
34    if 'includes' in t and 'media' in t['includes']:
35      for image in t['includes']['media']:
36        if 'media_key' in image and 'url' in image:
37          msg = json.dumps({
38            'id': image['media_key'],
39            'url': image['url']
40          }).encode('utf-8')
41          p.produce('urls', msg, callback=delivery_report)
42          p.poll(0)
43except KeyboardInterrupt:
44  pass
45finally:
46  p.flush(30)
Save this as producer.py and create a separate file delivery_report.py. This second file will include a callback for the Kafka producer which will run whenever a tweet’s URL is produced to the source topic:
1def delivery_report(err, msg):
2  if err is not None:
3    print('Message delivery failed: {}'.format(err))
4  else:
5    print('Message delivered to {} [{}]'.format(msg.topic(), msg.partition()))
Now create the topic urls (replace YOUR_BOOTSTRAP_SERVER with the bootstrap server(s) for Kafka):
1bin/kafka-topics.sh --create \
2  --topic urls \
3  --partitions 80 \
4  --bootstrap-server YOUR_BOOTSTRAP_SERVER:PORT
5
Note the topic urls has a very high number of partitions. This is not because the throughput on the topic is high, but because it is required to achieve a high degree of parallelism in the consumption, i.e., to have many consumers. Since the number of consumers is bound by the number of partitions, a large number of partitions is needed. In this case, the application does not require ordering, and in fact Kafka could be substituted for a lower-throughput system that supports acknowledgement at the message level (instead of at the max offset level), which would eliminate this constraint.
Make sure that confluent_kafka is installed:
pip install -U confluent_kafka
Finally, start producing URLs to the topic:
python producer.py
The output should show messages similar to the following:
Message delivered to urls [0]
Stop this application at any time by pressing Ctrl+D at any time. Make sure this doesn’t run for too long or it might use up Twitter API’s quota of 500,000 tweets per month.
LinkTransforming the data
Now that data is being produced to a source topic, the stream processing application can consume the URLs, load the content (i.e., the images) and extract the color palettes.
Start the application with the following imports and initialize Ray:
1from delivery_report import delivery_report
2import io
3import json
4import ray
5import requests
6from colorthief import ColorThief
7
8kafka = {
9  'connection': {'bootstrap.servers': 'YOUR_BOOTSTRAP_SERVER:PORT'},
10  'consumer': {
11    'group.id': 'ray',
12    'enable.auto.commit': True,
13    'auto.offset.reset': 'earliest'
14  },
15  'producer': {}
16}
17
18ray.init()
The application makes use of the two fundamental Ray concepts to achieve distributed execution: tasks and actors. To learn more about what tasks and actors, refer to this introductory blog post as well as this Ray docs walkthrough.
First, the Kafka producer exists within a RayProducer actor which will be responsible for producing the palettes output by the application to a sink topic:
1@ray.remote
2class RayProducer:
3  def __init__(self, kafka, sink):
4    from confluent_kafka import Producer
5    self.producer = Producer({**kafka['connection'], **kafka['producer']})
6    self.sink = sink
7
8  def produce(self, palette):
9    self.producer.produce(self.sink, json.dumps(palette).encode('utf-8'), callback=delivery_report)
10    self.producer.poll(0)
11
12  def destroy(self):
13    self.producer.flush(30)
This actor includes 3 methods:
A constructor
__init__that will create a Kafka producer and store the name of the sink topic.A
producemethod that will produce a palette record to the sink topic (producer.produce) and trigger any delivery report callback (producer.poll).A
destroymethod that will be called before exiting the application, and will wait for up to 30 seconds for any outstanding messages to be delivered and delivery report callbacks to be triggered (producer.flush).
Next, create an instance of this producer:
1producer = RayProducer.options(name='producer').remote(kafka, 'palettes')Note how the remote() syntax is used to create the producer since this is an actor. This actor is also given the name “producer” so it can be retrieved later by name. Only one producer is needed since the actual production rate is fairly low.
Next, the operation to transform the input message containing a URL into the output message containing a palette is defined in the get_palette task. This is the computationally intensive part of the application that will have to run in a distributed way to make sure that the transformation of URLs into palettes can keep up with the rate of production in the urls topic:
1@ray.remote(num_cpus=1)
2def get_palette(msg_value):
3  try:
4    r = requests.get(json.loads(msg_value.decode('utf-8'))['url'])
5    palette = ColorThief(io.BytesIO(r.content)).get_palette(color_count=6)
6    producer = ray.get_actor('producer')
7    ray.wait(producer.produce.remote(palette))
8  except Exception as e:
9    print('Unable to process image:', e)
This method uses requests.get to retrieve the URL contents, extracts a 6-color palette from the image, retrieves the “producer” actor that was previously created, and produces the palette into the sink topic. Note that the method decorator specifies num_cpus=1 which will ensure that Ray’s scheduler reserves 1 CPU for each execution of this task (or queue it if it’s not available).
Finally, the Kafka consumers exist within RayConsumer actors which will be responsible for consuming the URLs from the source topic:
1@ray.remote(num_cpus=.05)
2class RayConsumer(object):
3  def __init__(self, kafka, source):
4    from confluent_kafka import Consumer
5    self.c = Consumer({**kafka['connection'], **kafka['consumer']})
6    self.c.subscribe([source])
7
8 def start(self):
9    self.run = True
10    while self.run:
11      msg = self.c.poll(1.)
12      if msg is None:
13        continue
14      if msg.error():
15        print("Consumer error: {}".format(msg.error()))
16        continue
17      ray.get(get_palette.remote(msg.value()))
18
19  def stop(self):
20    self.run = False
21
22  def destroy(self):
23    self.c.close()
This actor includes 4 methods:
A constructor
__init__that will create a Kafka consumer and subscribe it to a source topic.A
startmethod that will run an infinite loop until the application is stopped (Ctrl+D). In this loop, when a new record is polled (c.poll), theget_palettetask is invoked and Ray blocks the consumer loop until it’s processed (ray.get). This means that withn_consumersthe application can have up ton_consumersconcurrentget_paletteexecutions (each of which take 1 CPU).A
stopmethod that will update the class property that stops the infinite loop.A
destroymethod that will be called before exiting the application to kill the consumers.
Note that the class decorator specifies num_cpus=.05. This tells the Ray scheduler to reserve 5% of 1 CPU in processing capacity for this actor because it’s not computationally intensive. This makes sense because the computationally intensive operation is get_palette and that will be scheduled separately. Setting num_cpus=1 here would be undesirable, since it would make the Ray scheduler reserve 1 CPU for every instance of this actor. Instead, with this configuration, the scheduler can pack up to 20 actors into a single CPU.
It’s possible to create a number of consumers equal to at most the number of partitions, but set n_consumers to 1 to run a single consumer as a starting point:
1n_consumers = 1 # At most, number of partitions in the `urls` topic.
2consumers = [RayConsumer.remote(kafka, 'urls') for _ in range(n_consumers)]
With everything set up, the last part of the application will start the Kafka stream processing application:
1try:
2  refs = [c.start.remote() for c in consumers]
3  ray.get(refs)
4except KeyboardInterrupt:
5  for c in consumers:
6    c.stop.remote()
7finally:
8  for c in consumers:
9    c.destroy.remote()
10  producer.destroy.remote()
11  ray.kill(producer)
This code starts n_consumers infinite loops in parallel. They will run until a keyboard interrupt (Ctrl+D), which will call stop to break the loop. Before the application exits, it will also call destroy on both the consumers and the producer, and kill the producer named actor.
Save all of this section’s code as transformer.py and make sure that colorthief is installed:
pip install -U colorthief
Finally, start Kafka stream processing job:
python transformer.py
The output should show messages similar to the following:
Message delivered to palettes [0]
With the previous producer.py script concurrently running, the end-to-end streaming application is ready!
Sadly, monitoring the `ray` consumer group reveals a major issue: it’s not keeping up with the production in the `urls` topic:
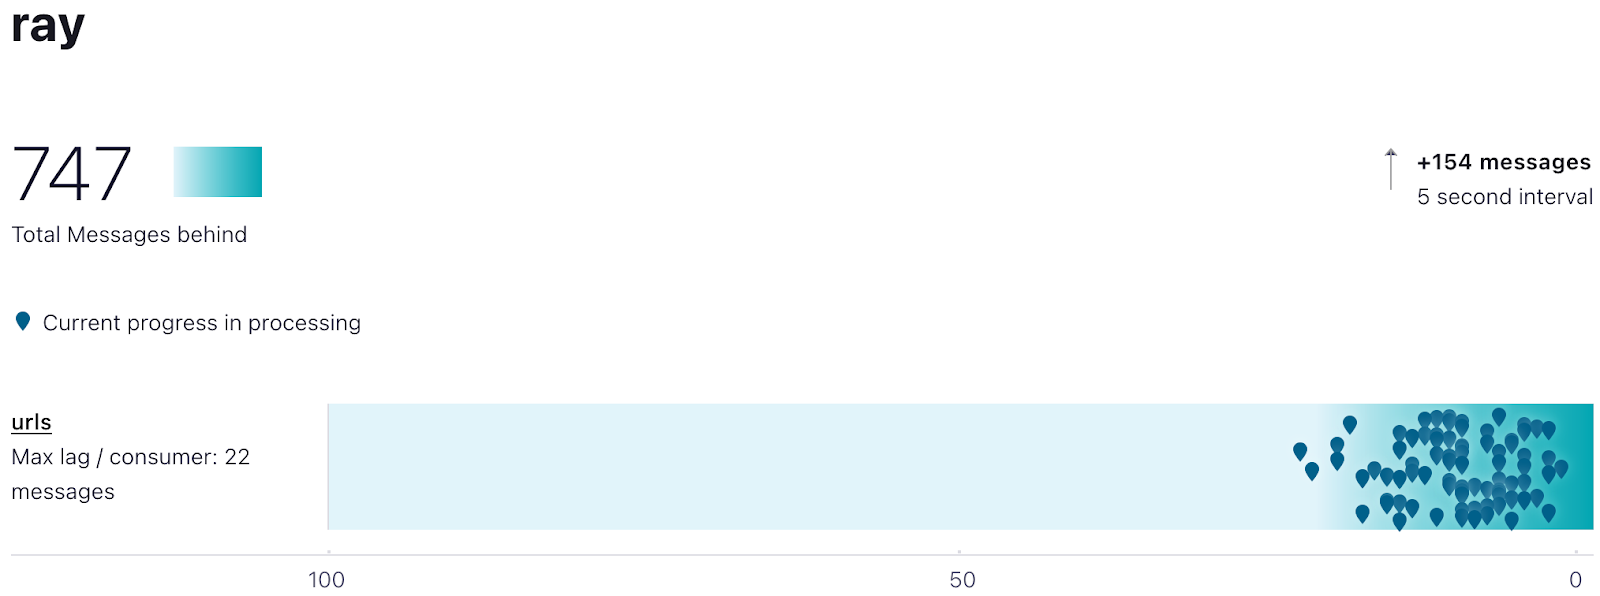 Consumer lag after a few seconds running a single consumer
This screenshot, taken after less than 30s of running producer.py concurrently with transformer.py shows a lag of 757 messages, with an increase of 154 messages in the last 5 seconds. Ideally this number to be 0 or as close to 0 as possible.
LinkScaling up
Ray can easily improve this situation by increasing the number of consumers in the previous code, which will parallelize the stream processing among cores in the same machine. By just changing n_consumers = 4, for example, the processing would be distributed between 4 cores. This might be a solution if one has access to a very powerful machine with lots of cores, but it’s not ideal because there will always be a limit to the size of machine that can be used, and it might be lower than the demands of the application. It might also be prohibitively expensive. What makes Ray even more powerful is that this problem can be solved by running the application in a cluster to achieve even more parallelization through scaling horizontally.
Recall that the application invoked the get_palette task which consumed 1 CPU. Depending on the number of partitions in the source topic (which was set to 80 in this example), the application could create (up to) as many actors as there are partitions and have each one independently submit images for processing, achieving a much higher degree of parallelism. To define a Ray cluster, all that is needed is access to a cloud environment, and Ray will “automagically” do the heavy lifting of starting the machines and distributing the workload!
Only one change to the transformer.py script is needed: change the ray.init() to ray.init(address='auto'). Now setting n_consumers = 80 (as that’s the maximum given the number of partitions in the topic) will make it possible to max out on the consumption parallelism.
Next step is getting the cluster ready. This demo will use AWS, but refer to the Ray docs for details on how to tweak this to work with Kubernetes, Azure and GCP. Start by defining a basic configuration for the cluster:
1cluster_name: kafka_autoscaler
2
3max_workers: 10
4
5idle_timeout_minutes: 1
6
7docker:
8    image: "rayproject/ray:latest-cpu"
9    container_name: "ray_container"
10
11provider:
12    type: aws
13    region: us-west-2
14    cache_stopped_nodes: False
15
16available_node_types:
17    default:
18        resources: {}
19        min_workers: 10
20        node_config:
21            InstanceType: m5.2xlarge
22
23head_node_type: default
24
25head_setup_commands: []
26
27setup_commands:
28    - pip install confluent_kafka colorthief
29
30file_mounts:
31    "~/code": "./code"
Save this as cluster.yaml. Here’s a description of what the code is doing:
It creates a cluster named `kafka_autoscaler`.
It specifies that the cluster will have at most 10 workers.
It sets the idle timeout for workers to 1 minute, which means that worker nodes will shut down after 1 minute of inactivity.
Cluster nodes will run the `rayproject/ray:latest-cpu` image in containers named “ray_container” using Docker
The cluster will be deployed on `aws` in the `us-west-2` region.
There will be only a single node type available. This node type is called “default,” its resources (number of CPUs provided by each node of this instance type) will be auto-filled by the autoscaler, and it will use m5.2xlarge instances. The definition also specifies that the cluster should have at least 10 workers. This is also the global maximum, and since both the minimum and maximum are 10 workers, the cluster will be forced to have exactly 10. Setting a minimum is not necessary, and the next section in this demo will examine what happens when this requirement is removed.
Files in the local directory “./code” will be mounted to the remote directory on each node at the path “~/code.”
Nodes will run a setup command to install the Python packages “confluent_kafka” (for a progress bar) and “colorthief” (for the palette extraction).
Now make sure the right dependencies are installed (run `pip install -U ray boto3`) and that the credentials are available to Ray (configure the AWS credentials in `~/.aws/credentials` as described in the AWS docs).
Now start the cluster with the Ray CLI:
ray up -y config.yaml
When this process completes, the Ray head node is ready. The head node will then proceed to start the worker nodes.
Connect to the head to start the distributed execution. To SSH into the cluster, run:
ray attach config.yaml
Check the startup status of all the remaining nodes by running:
ray status
Once the setup is complete, the output should resemble the following:
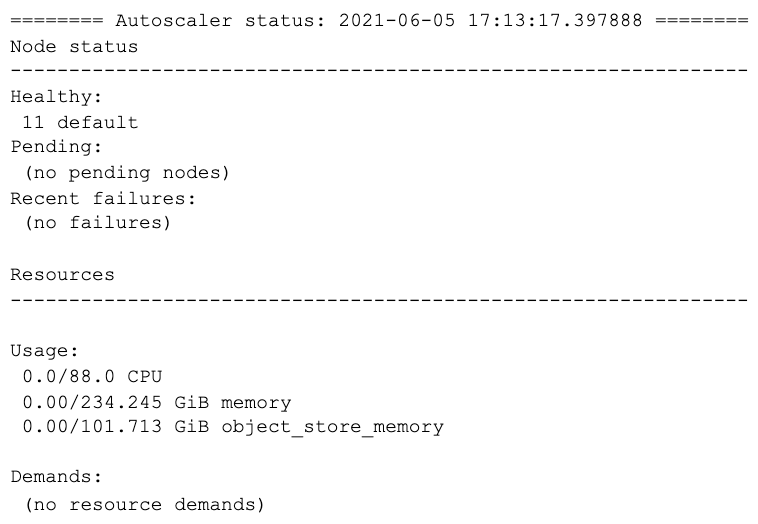
This shows that the cluster has 88 CPUs available (each m5.2xlarge provides 8 CPUs, and the cluster contains 1 head node and 10 workers).
The script was synced to the `~/code` folder. Start it by running:
python ~/code/transformer.py
Running producer.py in parallel now shows that the application is able to keep up:
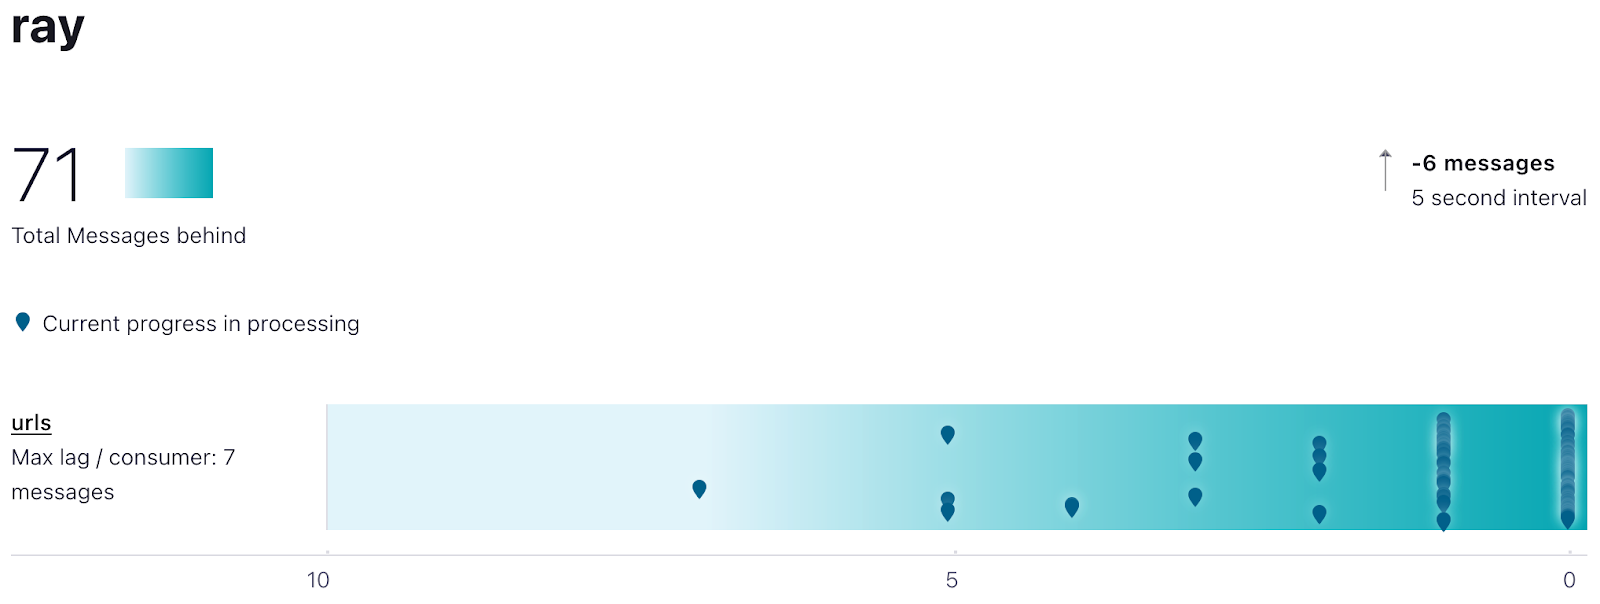 Consumer lag running on 88 cores (11 nodes with 8 CPUs).
Stop the producer and transformer (Ctrl+D). Stop the Ray cluster by running:
ray down -y cluster.yaml
LinkScaling up *and* down
The previous section made sure that the application was not underprovisioned, but it might be overprovisioned! Fortunately, Ray can automatically scale between just the head node and up to the previously configured max workers (10 in this example). Remove the min_workers: 10 line from cluster.yaml and run ray up -y cluster.yaml again to start the cluster with the new configuration. Run ray attach cluster.yaml to SSH back into the cluster, and then run ray status to see that the cluster now only contains 1 node (the head node):
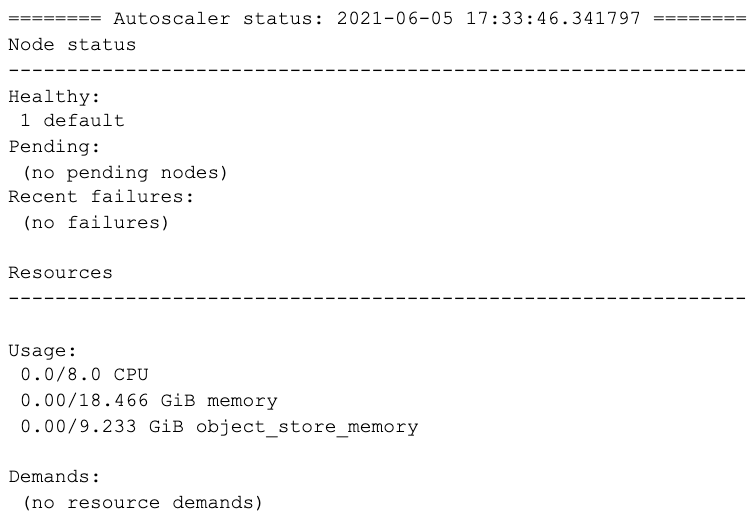
Start back both producer.py and transformer.py. Because the cluster only contains one node, the application will start lagging, but the autoscaler will add nodes as it sees more demand for CPUs than a single node can provide. Continue checking the progress of adding new nodes by running ray status on the head node. Once more capacity (more nodes) is added, the application should catch up. At first, this might cause the autoscaler to provision more than the steady-state capacity to go through the “backlog” of consumer group lag, and then it should shrink down to the size required for steady state (in a test run this was 5 nodes, i.e., 4 workers and the head node):
 Consumer running on 40 cores (5 nodes with 8 cores).
LinkConclusion
This demo shows the power of Ray for creating stream processing applications that can deliver a serverless experience with no changes to the application design and only minimal changes to the application code. Ray’s autoscaler is responsible for determining the right amount of resources at any time and delivering them so the application can run smoothly without wasting resources. In this example, the application was a basic image processing job. For simplicity, it didn’t cover more advanced elements of stream processing, such as exactly only once guarantees, which can also be delivered when using Ray for stream processing. Ray also offers a comprehensive stream processing library with common operators (e.g., filter) which will be covered in future blog posts.
Please check out the documentation for more details on Ray Clusters.If you’re interested in learning more, follow the Ray project on GitHub, join us on Discourse, and check out our whitepaper! If you're interested in helping us improve Ray and its user experience, we're hiring!
