Modern Distributed C++ with Ray
With the explosive growth of data, the development speed of internet businesses has been significantly higher than that of computer hardware. This means that there are more and more fields and scenarios that require distributed systems. As a native programming language, C++ is widely used in modern distributed systems due to its high performance and lightweight characteristics. For example, frameworks such as Tensorflow, Caffe, XGboost, and Redis have all chosen C/C++ as the main programming language.
Compared with single-machine systems, it isn’t easy to build a C++ distributed system with complete features and high availability for production environments. Usually we need to address the following issues:
Communication: We need to define the communication protocol between components through serialization tools such as protobuf, and then communicate through the RPC framework (or socket). It is also important to consider issues such as service discovery, synchronous/asynchronous IO, and multiplexing.
Deployment: Machines need to meet specific resource specifications and deploy processes from multiple components. Implementation may require integrating with different cloud platforms to implement resource scheduling.
Fault tolerance: This includes monitoring failure events on any node or component as well as restarting and recovering system state.
The Ray C++ API was designed to help address these issues so that programmers can focus on the logic of the system itself.
LinkWhat is Ray
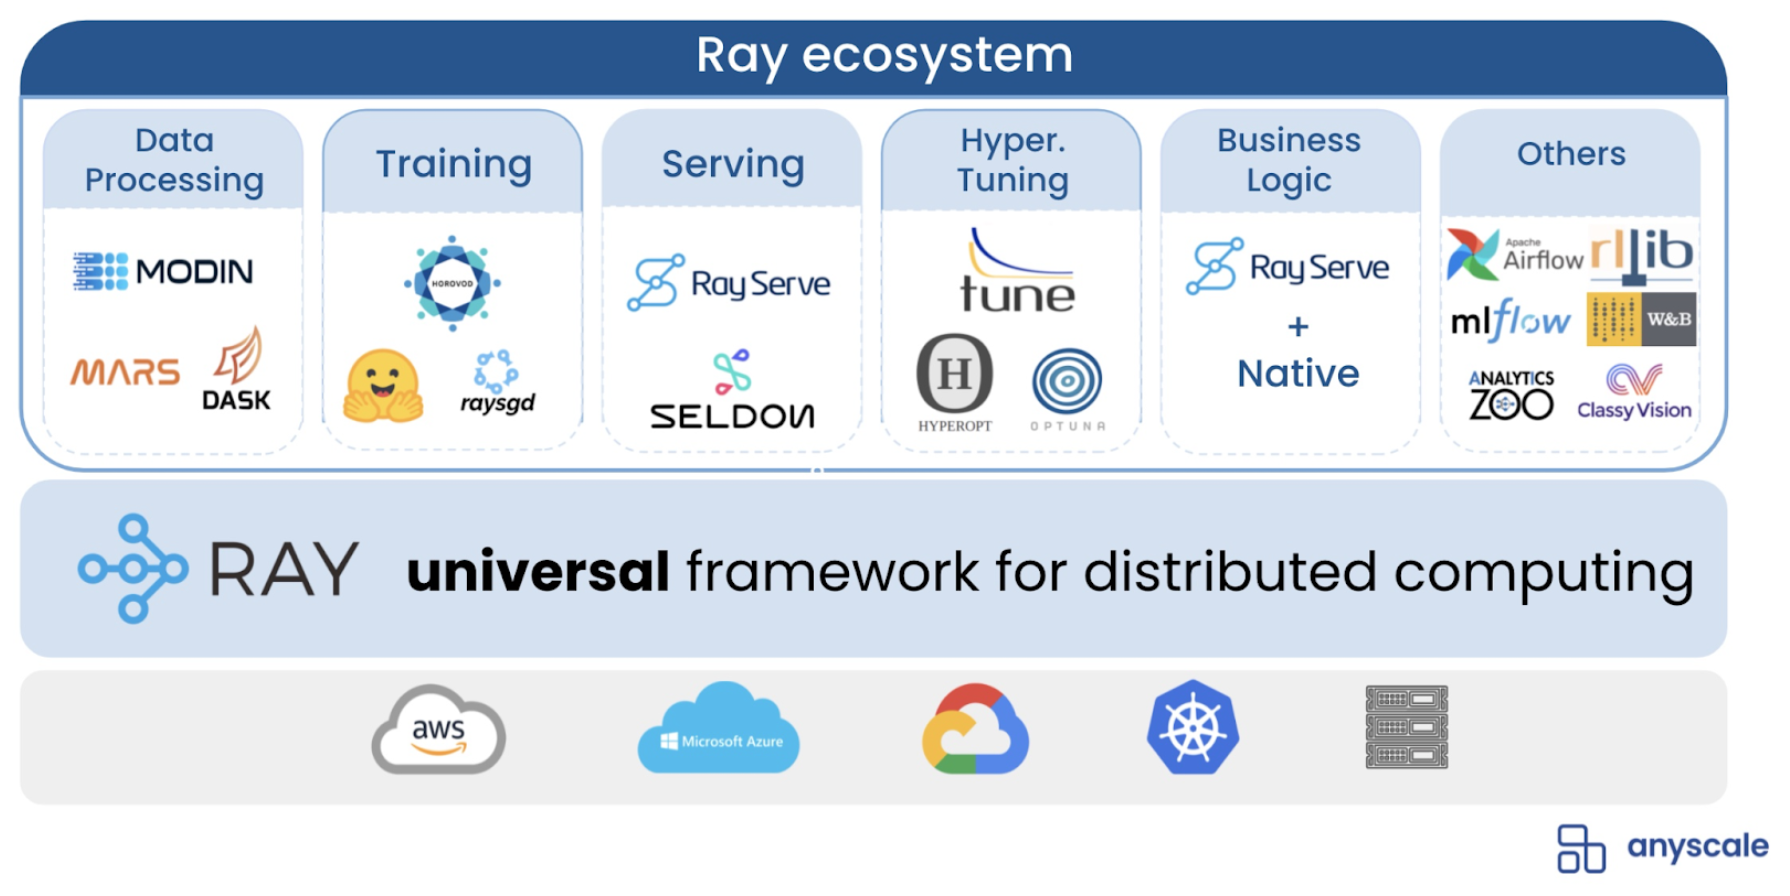
 Ray Ecosystem, from Ion Stoica’s keynote at Ray Summit 2021.
Ray is an open source library for parallel and distributed Python. In the past few years, Ray and its ecosystem (Ray Tune, Ray Serve, RLlib, etc) have developed rapidly. It is widely used to build various AI and big data systems in companies such as Ant Group, Intel, Microsoft, Amazon, and Uber. Compared with existing big data computing systems (Spark, Flink, etc.), Ray is not based on a specific computing paradigm such as DataStream or DataSet. From a system-level perspective, Ray's API is more low-level and more flexible. Ray takes the existing concepts of functions and classes and translates them to the distributed setting as tasks and actors. Ray will not limit your application scenarios, whether it is batch processing, stream computing, graph computing, or machine learning, scientific computing, etc., as long as you need to use multiple machines to complete a specific task in cooperation, you can choose Ray to help you to construct your distributed system.
LinkC++ API

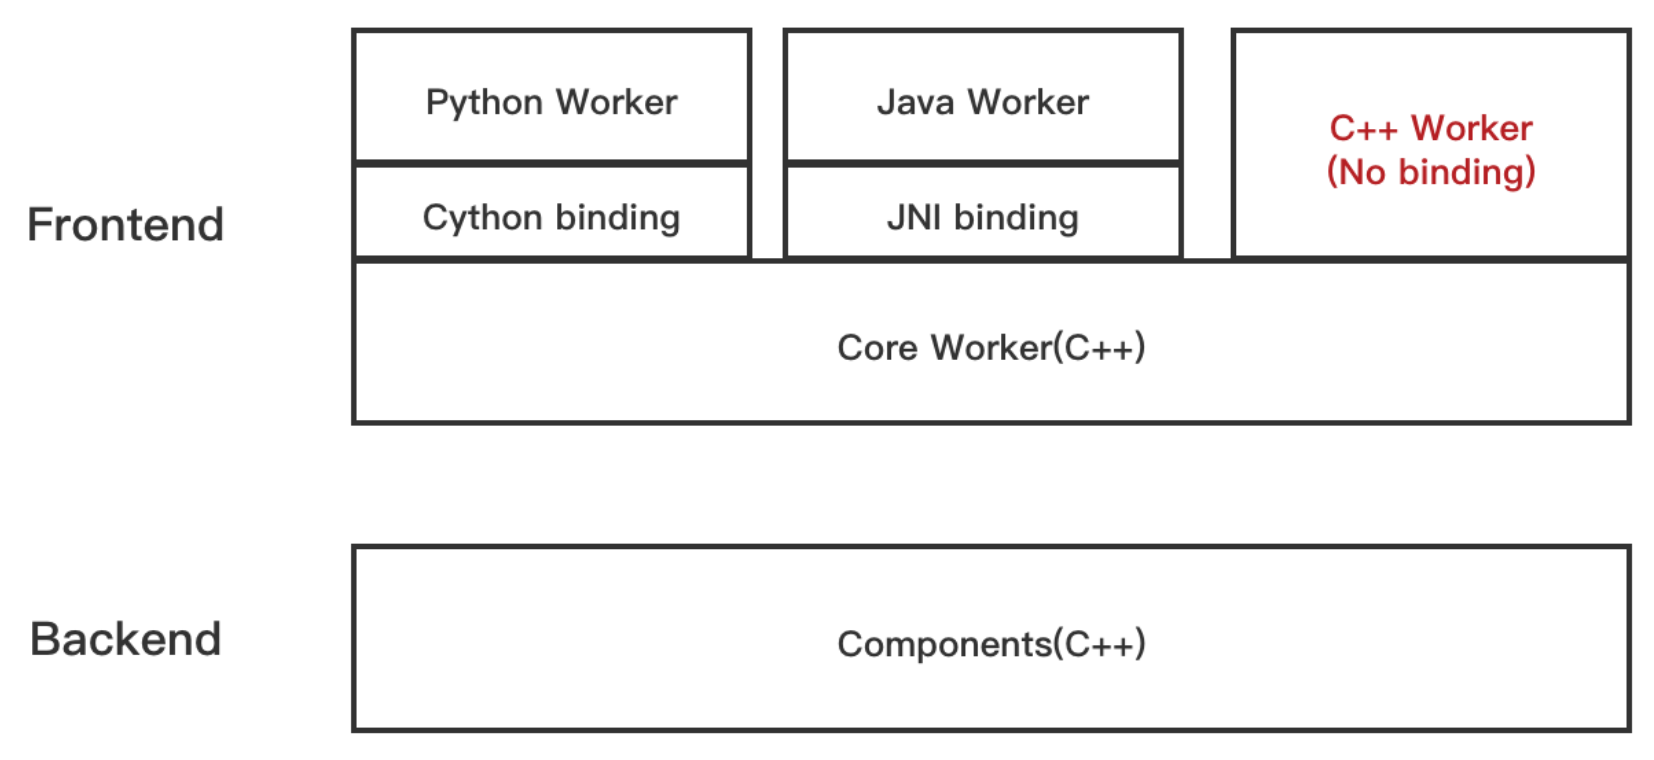
Originally, Ray only supported the Python API. In mid-2018, Ant Group contributed the Java API to the Ray Project. Recently, Ant Group contributed the C++ API to Ray. You may be wondering, why did we develop a C++ API when two popular languages were already supported? The main reason is that in some high-performance scenarios, Java and Python still cannot meet business needs even after system optimization. In addition, Ray Core and various components of Ray are pure C++ implementations. The C++ API can be used to seamlessly connect the user layer and the core layer which results in a system with no inter-language overhead.
LinkTask
A task in Ray corresponds to a function in single-machine programming. Through Ray's task API, it is easy to submit any C++ function to a distributed cluster for asynchronous execution. This greatly improves efficiency.
The code below defines the function heavy_compute. If we execute it 10,000 times serially in a single machine environment, it can take a very long time:
1int heavy_compute(int value) {
2  return value;
3}
4
5std::vector<int> results;
6for(int i = 0; i < 10000; i++) {
7  results.push_back(heavy_compute(i));
8}
9
Use Ray, we can easily transform it into a distributed function:
1// Define heavy_compute as remote function
2RAY_REMOTE(heavy_compute);
3
4std::vector<ray::ObjectRef<int>> results;
5for(int i = 0; i <10000; i++) {
6   // Use ray::Task to call remote functions, they are automatically dispatched by Ray to the nodes of the cluster to achieve distributed computing
7   results.push_back(ray::Task(heavy_compute).Remote(i));
8}
9
10// Get the results
11for(auto result: ray::Get(results)) {
12   std::cout<< *result << std::endl;
13}
14LinkActor
Ray Tasks are stateless. If you want to implement stateful computing, you need to use an Actor.
An actor corresponds to a class in single-machine programming. Based on Ray's distributed ability, we can transform the class Counter below into a distributed Counter deployed on a remote node.
1class Counter {
2  int count;
3public:
4  Counter(int init) {count = init;}
5  int Add(int x) {return x + 1;}
6};
7
8Counter *CreateCounter(int init) {
9  return new Counter(init);
10}
11RAY_REMOTE(CreateCounter, &Counter::Add);
12
13// Create a actor
14ActorHandle<Counter> actor = ray::Actor(CreateCounter).Remote(0);
15
16// Call the actor's remote function
17auto result = actor.Task(&Counter::Add).Remote(1);
18EXPECT_EQ(1, *(ray::Get(result)));
19LinkObject
In the Task and Actor examples above, we use "ray::Get" to get the final results. One concept that cannot be avoided here is Object. Each call to the "Remote" method returns an object reference (ObjectRef), and each ObjectRef points to a unique remote object in the cluster. If you've ever used Future, you should be able to understand Object more easily. In Ray, objects will be stored in a distributed store based on shared memory. When you call the "ray::Get" method to get an object, it will fetch data from the remote node, and return the result to your program after deserialization.
Besides storing the middle computing results of applications, you can also create an Object through "ray::Put". In addition, you can also wait for the results of a group of objects through the "ray::Wait" interface.
1// Put an object into the distributed store
2auto obj_ref1 = ray::Put(100);
3// Get data from the distributed store
4auto res1 = obj_ref1.Get();
5//Or call ray::Get(obj_ref1)
6EXPECT_EQ(100, *res1);
7
8// Waiting for a group of objects
9auto obj_ref2 = ray::Put(200);
10ray::Wait({obj_ref1, obj_ref2}, /*num_results=*/1, /*timeout_ms=*/1000);
11
From the basic API above, we know that Ray has solved the issues of communication, storage and data transmission. Ray also has some advanced features to solve other issues in distributed systems, such as scheduling options, fault tolerance, deployment and operation. The details of how to solve these other issues will be introduced in the following example.
LinkImplementation of Distributed Storage System with Ray C++
Let's now go over a practical example to see how to use the Ray C++ API to build a simple key-value (KV) storage system.
LinkExample description

In this KV storage system, there is a main server and a backup server. Only the main server provides services. The backup server is used to back up data. The system’s requirement is to have automatic failure recovery ability. That is, after any server dies, data will not be lost and services can continue to be provided.
Note: This is just a demo, and does not focus on the optimization of the storage itself. The purpose is to use the simple code to show how to use Ray to develop a distributed storage system quickly (complete code is available here).
LinkServer implementation
We’ll start by writing a single machine KV store first and then we’ll proceed to use Ray’s distributed deployment and scheduling abilities to transform it into a distributed KV store.
Linkmain server
1class MainServer {
2 public:
3  MainServer();
4
5  std::pair<bool, std::string> Get(const std::string &key);
6
7  void Put(const std::string &key, const std::string &val);
8
9 private:
10  std::unordered_map<std::string, std::string> data_;
11};
12
13std::pair<bool, std::string> MainServer::Get(const std::string &key) {
14  auto it = data_.find(key);
15  if (it == data_.end()) {
16    return std::pair<bool, std::string>{};
17  }
18
19  return {true, it->second};
20}
21
22void MainServer::Put(const std::string &key, const std::string &val) {
23  // First synchronize the data to the backup server
24  ...
25
26  // Update the local kv
27  data_[key] = val;
28}
29
It seems that this is a general KV store which is no different from a local KV. We don’t need to care about the details of the distribution, just focus on the storage logic itself. Note that in the implementation of Put, we need to write the data to the backup server synchronously and write locally to ensure data consistency.
Linkbackup server
1class BackupServer {
2 public:
3  BackupServer();
4
5  // When the master node restarts, it will call GetAllData for data recovery
6  std::unordered_map<std::string, std::string> GetAllData() {
7    return data_;
8  }
9
10  // When the master node writes data, it will call SyncData to synchronize the data to this backup node first
11  void SyncData(const std::string &key, const std::string &val) {
12    data_[key] = val;
13  }
14
15 private:
16  std::unordered_map<std::string, std::string> data_;
17};
18LinkDeployment
LinkCluster deployment
Before deploying the application, we need to deploy a Ray cluster first. Currently, Ray has supported one-click deployment on popular cloud platforms, such as AWS, Azure, GCP, Aliyun and Kubernetes environments. If you already have a configuration file, you can deploy via the command line after installing Ray:
1ray up -y config.yamlFor specific configurations, please refer to the documentation here.
Another option, if you already have running machines, you can manually set up a Ray cluster by using the ray start command on each machine:
Choose a machine as the master node:
ray start --head
Join the cluster on other machines:
ray start --address=${HEAD_ADDRESS}
LinkActor deployment
After the Ray cluster, we need to deploy the two actor instances, the MainServer and BackupServer, to provide distributed storage services. We can use the Ray API to create an actor easily to implement actor deployment.
1static MainServer *CreateMainServer() {return new MainServer();}
2
3static BackupServer *CreateBackupServer() {return new BackupServer();}
4
5// Declare remote function
6RAY_REMOTE(CreateMainServer, CreateBackupServer);
7
8const std::string MAIN_SERVER_NAME = "main_actor";
9const std::string BACKUP_SERVER_NAME = "backup_actor";
10
11// Deploy the actor instances to the Ray cluster by ray::Actor
12void StartServer() {
13  ray::Actor(CreateMainServer)
14      .SetName(MAIN_SERVER_NAME)
15      .Remote();
16
17  ray::Actor(CreateBackupServer)
18      .SetName(BACKUP_SERVER_NAME)
19      .Remote();
20}LinkScheduling
LinkSpecify resources
If you have special requirements for the hardware of the actor running environment, you can also specify resources, such as CPU, memory and other resources.
1// required resources: cpu:1, memory 1G
2const std::unordered_map<std::string, double> RESOURCES{
3    {"CPU", 1.0}, {"memory", 1024.0 * 1024.0 * 1024.0}};
4
5// Deploy the actor instances to the Ray cluster with resource requirements
6void StartServer() {
7  ray::Actor(CreateMainServer)
8      .SetName(MAIN_SERVER_NAME)
9      .SetResources(RESOURCES) //Set resources
10      .Remote();
11
12  ray::Actor(CreateBackupServer)
13      .SetName(BACKUP_SERVER_NAME)
14      .SetResources(RESOURCES) //Set resources
15      .Remote();
16}LinkScheduling strategy
We hope to schedule the two actors of the main server and the backup server to different machines to ensure that the failure of one machine will not affect the two servers at the same time. In this case, we can use Ray's Placement Group to achieve the special scheduling requirement.
A placement Group allows you to preset some resources from the cluster for Task and Actor.
1ray::PlacementGroup CreateSimplePlacementGroup(const std::string &name) {
2  // Set Placement Group resources
3  std::vector<std::unordered_map<std::string, double>> bundles{RESOURCES, RESOURCES};
4
5  // Create Placement Group and set the scheduling strategy to SPREAD
6  ray::PlacementGroupCreationOptions options{
7      false, name, bundles, ray::PlacementStrategy::SPREAD};
8  return ray::CreatePlacementGroup(options);
9}
10
11auto placement_group = CreateSimplePlacementGroup("my_placement_group");
12assert(placement_group.Wait(10));
The code above creates a Placement Group, and the scheduling strategy is SPREAD. The meaning of SPREAD is to schedule actors to different nodes. For more scheduling strategies, please refer to the documentation here.
Next, we can schedule actors to different nodes through the Placement Group.
1// Scheduling actor instances to different nodes in the Ray cluster
2void StartServer() {
3  // Scheduling the main server
4  ray::Actor(CreateMainServer)
5      .SetName(MAIN_SERVER_NAME)
6      .SetResources(RESOURCES)
7      .SetPlacementGroup(placement_group, 0) //Scheduled to one node
8      .Remote();
9
10  // Scheduling backup server
11  ray::Actor(CreateBackupServer)
12      .SetName(BACKUP_SERVER_NAME)
13      .SetResources(RESOURCES)
14      .SetPlacementGroup(placement_group, 1) //Scheduled to another node
15      .Remote();
16}LinkService discovery and component communication
Now that we have deployed the two actor instances of the main server and the backup server to the two nodes in the Ray cluster, we need to achieve the service discovery of the main server and the client-server communication.
Ray's named actor can easily achieve service discovery. We set the actor's name when creating the actor, and then use ray::GetActor(name) to discover the created actor. A Ray Task can handle the communication between the client and the server. Using Ray Task, we don't need to care about the details of communication, such as transmission protocol.
1class Client {
2 public:
3  Client() {
4   // Discover the actor
5    main_actor_ = ray::GetActor<MainServer>(MAIN_SERVER_NAME);
6  }
7
8  bool Put(const std::string &key, const std::string &val) {
9    // Use Ray Task to call the Put function of the remote main server
10    (*main_actor_).Task(&MainServer::Put).Remote(key, val).Get();
11
12    return true;
13  }
14
15  std::pair<bool, std::string> Get(const std::string &key) {
16    // Use Ray Task to call the Get function of the remote main server
17    return *(*main_actor_).Task(&MainServer::Get).Remote(key).Get();
18  }
19
20 private:
21  boost::optional<ray::ActorHandle<MainServer>> main_actor_;
22};LinkFault tolerance
LinkProcess fault tolerance
Ray provides the ability of process fault tolerance. After the actor process dies, Ray will automatically re-create the actor instance. We only need to set the maximum number of restarts of the actor.
1// Schedule the actor instances and set the maximum number of restarts
2void StartServer() {
3  ray::Actor(CreateMainServer)
4      .SetName("main_actor")
5      .SetResources(RESOURCES)
6      .SetPlacementGroup(placement_group, 0)
7      .SetMaxRestarts(1) //Set the maximum number of restarts to achieve automatic fault recovery
8      .Remote();
9
10  ray::Actor(CreateBackupServer)
11      .SetName("backup_actor")
12      .SetResources(RESOURCES)
13      .SetPlacementGroup(placement_group, 1)
14      .SetMaxRestarts(1) //Set the maximum number of restarts to achieve automatic fault recovery
15      .Remote();
16}LinkState fault tolerance
Although Ray can handle process failures and re-create the actor instances, we also need to recover the state of the actor after the process restarted. For example, after the main actor restarted, the data in the memory will be lost and we need to recover from the backup server.
1MainServer::MainServer() {
2  // If the current instance is restarted, do failover handling
3  if (ray::WasCurrentActorRestarted()) {
4    HandleFailover();
5  }
6}
7
8void MainServer::HandleFailover() {
9  backup_actor_ = *ray::GetActor<BackupServer>(BACKUP_SERVER_NAME);
10  // Pull all data from the backup server
11  data_ = *backup_actor_.Task(&BackupServer::GetAllData).Remote().Get();
12}
Note: The fault tolerance of the main server is done in the constructor. Ray provides an API to determine whether the actor instance is restarted. If the actor instance is a restarted actor, the data will be restored. The detail is to pull data from the backup server. The fault tolerance processing of the backup server is similar.
LinkOperation and monitoring
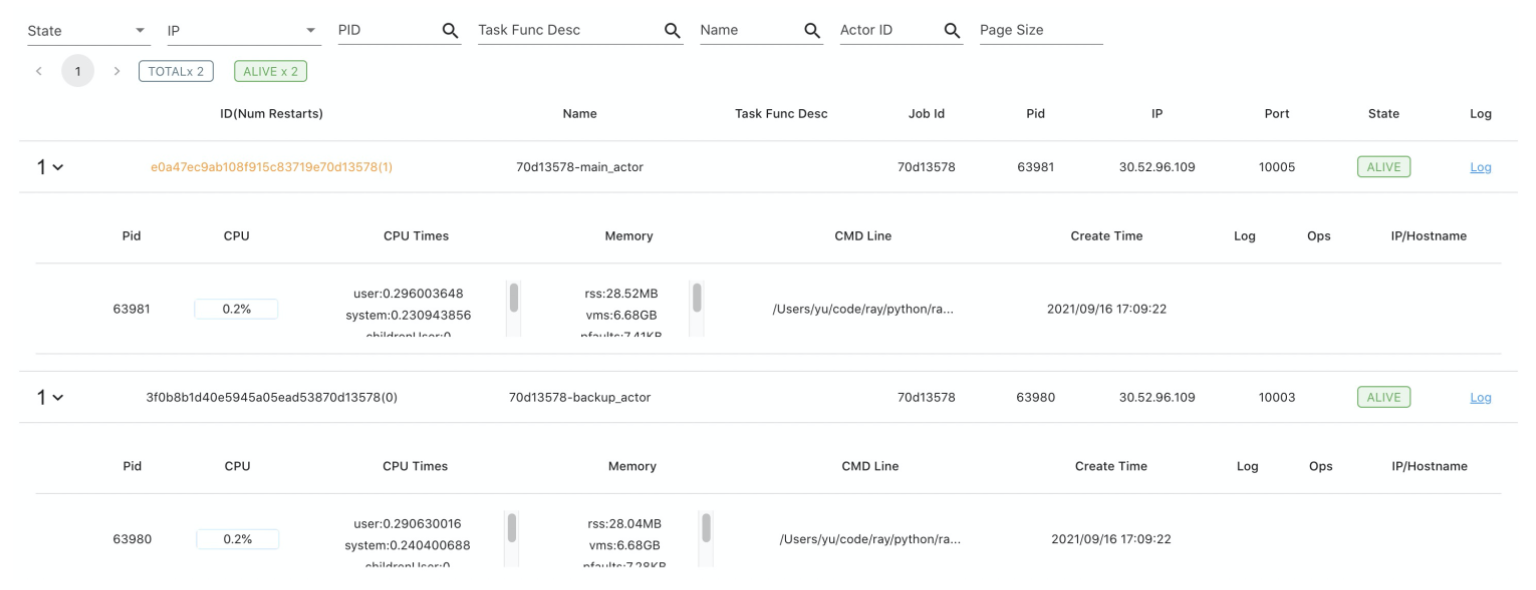
Ray provides a dashboard for operation and monitoring. So, we can view the state of the Ray cluster and applications in real time.
In the simple KV store example above, we can see information such as the actor list, node list, process logs, and catch some abnormal events.
LinkActor list

LinkNode list

LinkLogs

LinkEvents

LinkQuick start
Ray is multi-language so running C++ applications requires both a Python environment and a C++ environment. In result, we packaged the C++ library into a wheel which is managed by pip as well as python. You can quickly generate a Ray C++ project template in the following way.
Note: Environmental requirements: Linux or macOS system, Python 3.6-3.9 version, C++14 environment, bazel 3.4 or above version (optional, template based on bazel).
Install the latest version of Ray with C++ support:
pip install -U ray[cpp]
Generate a C++ project template through Ray command line:
mkdir ray-template && ray cpp --generate-bazel-project-template-to ray-template
Change directory to the project template, compile and run:
cd ray-template && sh run.sh
The run mode will launch a Ray cluster locally before the running of the example, and will automatically shut down the Ray cluster after the example runs. If you want to connect an existing Ray cluster, you can start it as follows:
ray start --head
RAY_ADDRESS=127.0.0.1:6379 sh run.sh
After the testing, you can shut down the Ray cluster by the command:
ray stop
Now, you can start to develop your own C++ distributed system based on the project template!
LinkSummary
This blog introduced the Ray C++ API and showed a practical example of how to use it to build a distributed key-value storage system. The code was around 200 lines, but it showed how to deal with the issues of deployment, scheduling, communication, fault tolerance, operation and monitoring. To learn more about this new API, please check out the Ray documentation. If you would like to contribute to the continued growth of this project, you can submit a pull request on github or submit an issue. If you would like to get in touch with us, you can contact us through Ray’s slack channel or through the official WeChat Chinese account by searching “Ray中文社区”.

