Getting Started with Distributed Machine Learning with PyTorch and Ray
Ray is a popular framework for distributed Python that can be paired with PyTorch to rapidly scale machine learning applications.
Machine learning today requires distributed computing. Whether you’re training networks, tuning hyperparameters, serving models, or processing data, machine learning is computationally intensive and can be prohibitively slow without access to a cluster. Ray is a popular framework for distributed Python that can be paired with PyTorch to rapidly scale machine learning applications.
This post covers various elements of the Ray ecosystem and how it can be used with PyTorch!
LinkWhat is Ray
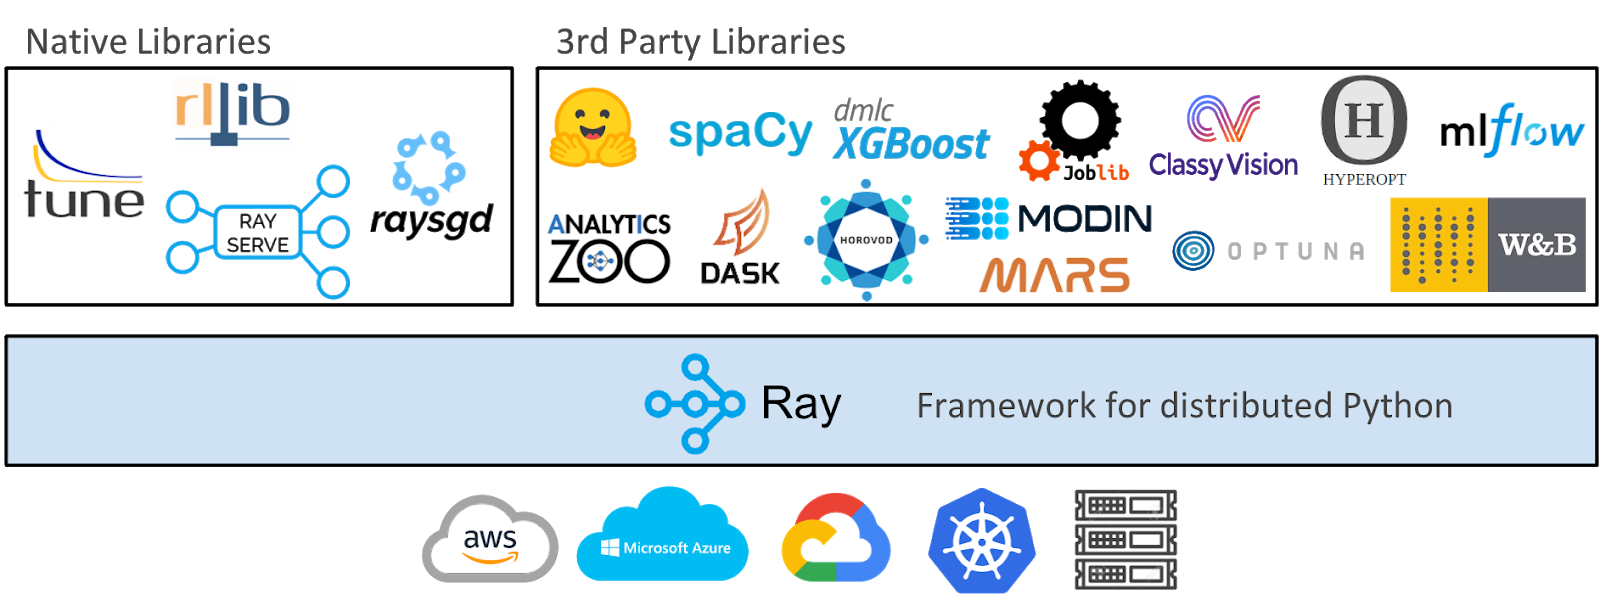
Ray is an open source library for parallel and distributed Python. The diagram above shows that at a high level, the Ray ecosystem consists of three parts: the core Ray system, scalable libraries for machine learning (both native and third party), and tools for launching clusters on any cluster or cloud provider.
LinkThe Core Ray System
Ray can be used to scale Python applications across multiple cores or machines. It has a couple major advantages including:
Simplicity: you can scale your Python applications without rewriting them, and the same code can run on one machine or multiple machines.
Robustness: applications gracefully handle machine failures and preemption.
Performance: tasks run with millisecond latencies, scale to tens of thousands of cores, and handle numerical data with minimal serialization overhead.
LinkLibrary Ecosystem
Because Ray is a general-purpose framework, the community has built many libraries and frameworks on top of it to accomplish different tasks. The vast majority of these support PyTorch, require minimal modifications to your code, and integrate seamlessly with each other. Below are just a few of the many libraries in the ecosystem.
RaySGD
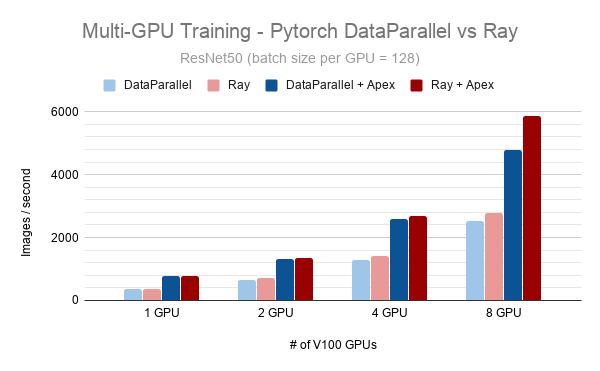 Comparison of PyTorch’s DataParallel vs Ray (which uses PyTorch’s Distributed DataParallel underneath the hood) on p3dn.24xlarge instances.
RaySGD is a library that provides distributed training wrappers for data parallel training. For example, the RaySGD TorchTrainer is a wrapper around torch.distributed.launch. It provides a Python API to easily incorporate distributed training into a larger Python application, as opposed to needing to wrap your training code in bash scripts.
Some other advantages of the library are:
Ease of use: You can scale PyTorch’s native DistributedDataParallel without needing to monitor individual nodes.
Scalability: You can scale up and down. Start on a single CPU. Scale up to multi-node, multi-CPU, or multi-GPU clusters by changing 2 lines of code.
Accelerated Training: There is built-in support for mixed precision training with NVIDIA Apex.
Fault Tolerance: There is support for automatic recovery when cloud machines are preempted.
Compatibility: There is seamless integration with other libraries like Ray Tune and Ray Serve.
You can get started with TorchTrainer by installing Ray (pip install -U ray torch) and running the code below:
1import torch
2from torch.utils.data import DataLoader
3from torchvision.datasets import CIFAR10
4import torchvision.transforms as transforms
5
6import ray
7from ray.util.sgd.torch import TorchTrainer
8# https://github.com/kuangliu/pytorch-cifar/blob/master/models/resnet.py
9from ray.util.sgd.torch.resnet import ResNet18
10
11def cifar_creator(config):
12    """Returns dataloaders to be used in `train` and `validate`."""
13    tfms = transforms.Compose([
14        transforms.ToTensor(),
15        transforms.Normalize((0.4914, 0.4822, 0.4465),
16                             (0.2023, 0.1994, 0.2010)),
17    ])  # meanstd transformation
18    train_loader = DataLoader(
19        CIFAR10(root="~/data", download=True, transform=tfms), batch_size=config["batch"])
20    validation_loader = DataLoader(
21        CIFAR10(root="~/data", download=True, transform=tfms), batch_size=config["batch"])
22    return train_loader, validation_loader
23
24def optimizer_creator(model, config):
25    """Returns an optimizer (or multiple)"""
26    return torch.optim.SGD(model.parameters(), lr=config["lr"])
27
28ray.init()
29
30trainer = TorchTrainer(
31    model_creator=ResNet18,  # A function that returns a nn.Module
32    data_creator=cifar_creator,  # A function that returns dataloaders
33    optimizer_creator=optimizer_creator,  # A function that returns an optimizer
34    loss_creator=torch.nn.CrossEntropyLoss,  # A loss function
35    config={"lr": 0.01, "batch": 64},  # parameters
36    num_workers=2,  # amount of parallelism
37    use_gpu=torch.cuda.is_available(),
38    use_tqdm=True)
39
40stats = trainer.train()
41print(trainer.validate())
42
43torch.save(trainer.state_dict(), "checkpoint.pt")
44trainer.shutdown()
45print("success!")
The script will download CIFAR10 and use a ResNet18 model to do image classification. With a single parameter change (num_workers=N), you can utilize multiple GPUs.
If you would like to learn more about RaySGD and how to scale PyTorch training across a cluster, you should check out this blog post.
Ray Tune
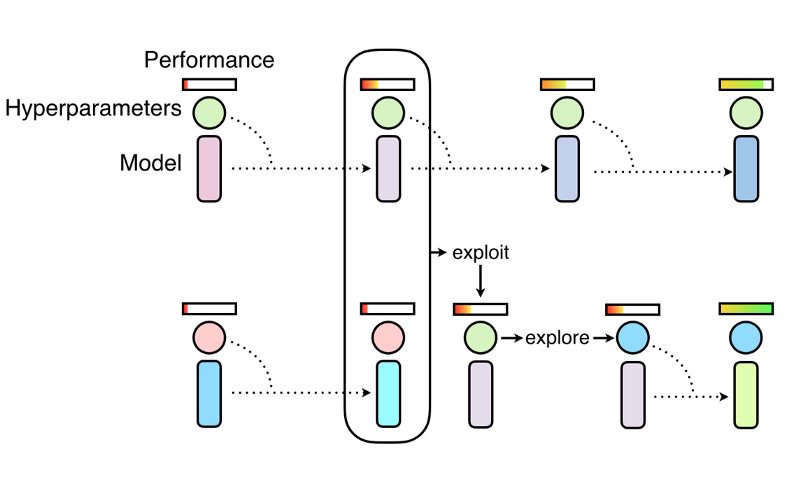 Ray Tune’s implementation of optimization algorithms like Population Based Training (shown above) can be used with PyTorch for more performant models. Image from Deepmind.
Ray Tune is a Python library for experiment execution and hyperparameter tuning at any scale. Some advantages of the library are:
The ability to launch a multi-node distributed hyperparameter sweep in fewer than 10 lines of code.
Support for every major machine learning framework including PyTorch.
First-class support for GPUs.
Automatic management of checkpoints and logging to TensorBoard.
Access to state of the art algorithms such as Population Based Training (PBT), BayesOptSearch, HyperBand/ASHA.
You can get started with Ray Tune by installing Ray (pip install ray torch torchvision) and running the code below.
1import numpy as np
2import torch
3import torch.optim as optim
4
5from ray import tune
6from ray.tune.examples.mnist_pytorch import get_data_loaders, train, test
7import ray
8import sys
9
10if len(sys.argv) > 1:
11    ray.init(redis_address=sys.argv[1])
12
13import torch.nn as nn
14import torch.nn.functional as F
15
16class ConvNet(nn.Module):
17    def __init__(self):
18        super(ConvNet, self).__init__()
19        self.conv1 = nn.Conv2d(1, 3, kernel_size=3)
20        self.fc = nn.Linear(192, 10)
21
22    def forward(self, x):
23        x = F.relu(F.max_pool2d(self.conv1(x), 3))
24        x = x.view(-1, 192)
25        x = self.fc(x)
26        return F.log_softmax(x, dim=1)
27
28def train_mnist(config):
29    model = ConvNet()
30    train_loader, test_loader = get_data_loaders()
31    optimizer = optim.SGD(
32        model.parameters(), lr=config["lr"], momentum=config["momentum"])
33    for i in range(10):
34        train(model, optimizer, train_loader, torch.device("cpu"))
35        acc = test(model, test_loader, torch.device("cpu"))
36        tune.track.log(mean_accuracy=acc)
37        if i % 5 == 0:
38            # This saves the model to the trial directory
39            torch.save(model.state_dict(), "./model.pth")
40
41from ray.tune.schedulers import ASHAScheduler
42
43search_space = {
44    "lr": tune.choice([0.001, 0.01, 0.1]),
45    "momentum": tune.uniform(0.1, 0.9)
46}
47
48analysis = tune.run(
49    train_mnist,
50    num_samples=30,
51    scheduler=ASHAScheduler(metric="mean_accuracy", mode="max", grace_period=1),
52    config=search_space)
The script shows you how to leverage a state-of-the-art early stopping algorithm AHSA which terminates trials that are less promising and allocates more time and resources to more promising trials. If you would like to learn about how to incorporate Ray Tune into your PyTorch workflow, you should check out this blog post.
Ray Serve
 Ray Serve can not only be used to serve models on its own, but also to scale other serving tools like FastAPI.
Ray Serve is a library for easy-to-use scalable model serving. Some advantages of the library are:
The ability to use a single toolkit to serve everything from deep learning models (PyTorch, TensorFlow, etc) to scikit-learn models, to arbitrary Python business logic.
Scale to many machines, both in your datacenter and in the cloud.
Compatibility with many other libraries like Ray Tune and FastAPI.
If you would like to learn how to incorporate Ray Serve and Ray Tune together into your PyTorch workflow, you should check out the documentation for a full code example.
RLlib
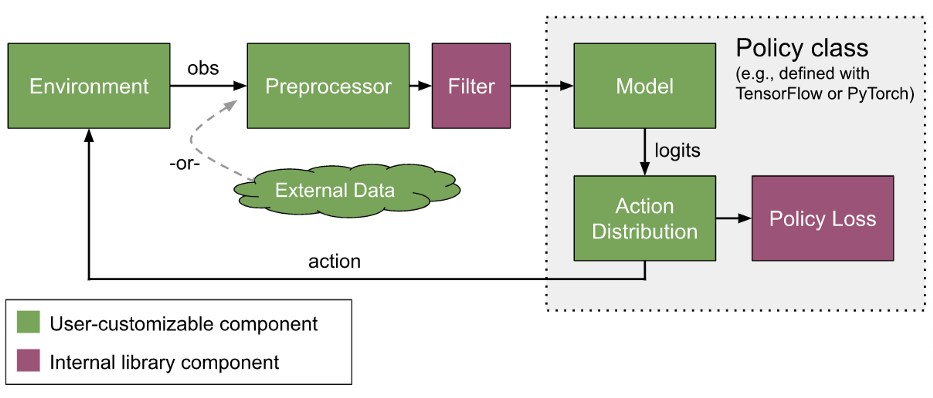 RLlib provides ways to customize almost all aspects of training, including neural network models, action distributions, policy definitions, environments, and the sample collection process.
RLlib is a library for reinforcement learning that offers both high scalability and a unified API for a variety of applications. Some advantages include:
Native support for PyTorch, TensorFlow Eager, and TensorFlow (1.x and 2.x)
Support for model-free, model-based, evolutionary, planning, and multi-agent algorithms
Support for complex model types, such as attention nets and LSTM stacks via simple config flags and auto-wrappers
Compatibility with other libraries like Ray Tune
Cluster Launcher
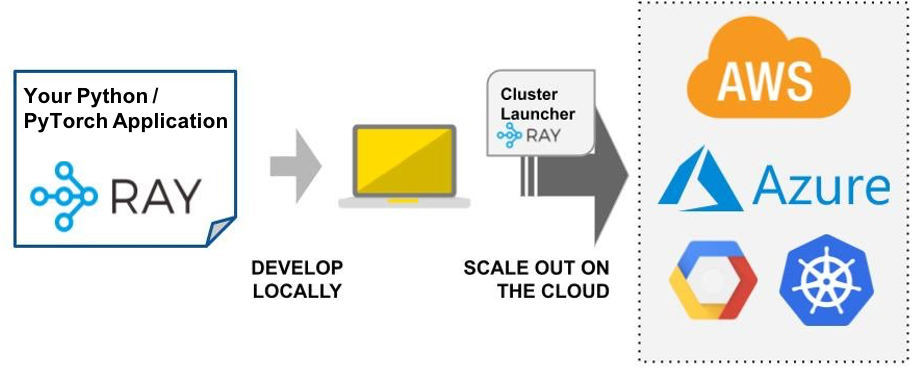 The Ray Cluster Launcher simplifies the process of launching and scaling across any cluster or cloud provider.
Once you have developed an application on your laptop and want to scale it up to the cloud (perhaps with more data or more GPUs), the next steps aren’t always clear. The process is either to have an infrastructure team set it up for you or to go through the following steps.
1. Choose a cloud provider (AWS, GCP, or Azure).
2. Navigate the management console to set instance types, security groups, spot prices, instance limits, and more.
3. Figure out how to distribute your Python script across a cluster.
An easier approach is to use the Ray Cluster Launcher to launch and scale machines across any cluster or cloud provider. Cluster Launcher allows you autoscale, sync files, submit scripts, port forward, and more. This means that you can run your Ray clusters on Kubernetes, AWS, GCP, Azure, or a private cluster without needing to understand the low-level details of cluster management.
LinkConclusion
 Ray provides a distributed computing foundation for Ant Group’s Fusion Engine.
This article contained some of the benefits of Ray in the PyTorch ecosystem. Ray is being used for a wide variety of applications from Ant Group using Ray to support its financial business, to LinkedIn running Ray on Yarn, to Pathmind using Ray to connect reinforcement learning to simulation software, and more. If you have any questions or thoughts about Ray or want to learn more about parallel and distributed Python, please join our community through Discourse, Slack, or GitHub.
Originally published on PyTorch’s Blog.

