Building an LLM-powered GitHub bot to improve your pull requests
Update June 2024: Anyscale Endpoints (Anyscale's LLM API Offering) and Private Endpoints (self-hosted LLMs) are now available as part of the Anyscale Platform. Click here to get started on the Anyscale platform.
[ Code | Install the bot | Anyscale Endpoints | Ray Docs ] · 30 min read
Technical writing is hard. Developers want to focus on their core coding responsibilities, but it’s inevitable for technical experts to also participate in documentation efforts. Often, nobody else could even write the content in question. This means that many pull requests contain both code and plain English (or other natural languages). At Anyscale, we’ve embraced the Google developer doc style guide, and recommend using Vale to enforce it. But in practice it can happen that one slips up and introduces minor syntax or grammar errors. In fact, if you’re focusing mostly on code quality, writing quality might just not be top of mind. Ineffective or misleading formulations can be the result of that.
By developing a bot that helps spot mistakes and inconsistencies in an automated fashion, developers get valuable feedback – directly in their PRs on GitHub. Let’s have a look at what Docu Mentor does for you in practice.
In this guide you’ll learn to:
💻 Build an LLM-powered bot, using Anyscale Endpoints and Anyscale Services, from scratch.
🚀 Scale out the bot’s workload efficiently using Ray.
✅ Evaluate the bot’s performance with the help of GPT-4 as evaluator by writing automated tests.
🔀 Learn to leverage the GitHub API to hook into your pull requests and issues.
📦 Deploy your bot and make it publicly available.
💡 Create, deploy and share your own GitHub bots.
LinkIntroducing Docu Mentor

Two months ago we introduced Anyscale Endpoints as a cost-effective way to work with powerful open-source LLMs. We offer Endpoints to our customers, but we also use it internally to run experiments and constantly improve our own products. For instance, we concluded that you can run summarization tasks as well as GPT-4 with much cheaper Endpoints models, and we fine-tuned models available on Endpoints for domain-specific tasks.
In this post we’re building a GitHub bot called “Docu Mentor” that you can mention in your pull requests to help you improve your writing. The bot is already up, and you can install it from GitHub in just a few clicks. The code for this whole app clocks in at just 250 lines of code and is freely available on GitHub. You can fork it, modify it, and build your own app in no time, and we’ll show you exactly how in this post.
LinkDocu Mentor in action
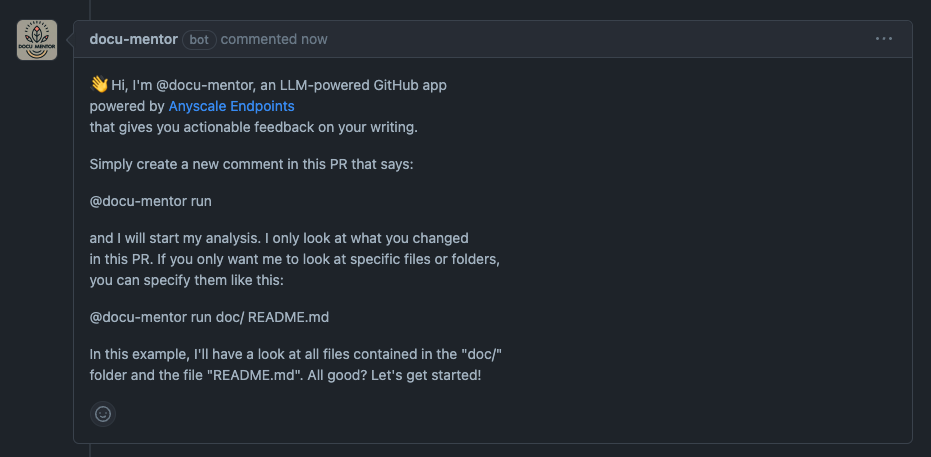
After you install the bot in your repo, whenever you open a new pull request, the @docu-mentor bot will write a friendly helper message as a GitHub issue comment into your PR.

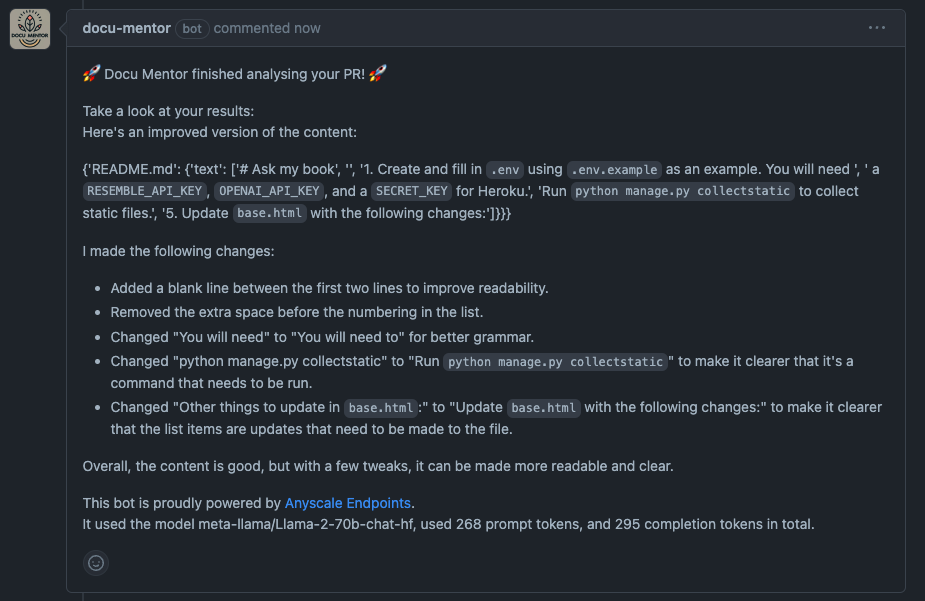
You can trigger the bot by simply creating a comment of your own saying “@docu-mentor run”. This will analyze all the changes you’ve made in this PR, to give you suggestions on how to improve it. Often, most of the files in your PR will just be code changes, so if you’re seeking feedback on a single file or a specific folder, you can point Docu Mentor to those files. Here’s an example of me asking the bot to comment on the changes I’ve made in my README.md:

After a couple of seconds, Docu Mentor will get back to you with the results of its analysis. You can then incorporate that feedback into your PR to the extent you want.

LinkHow Docu Mentor works
At the core of our bot is a call to the codellama/CodeLlama-34b-Instruct-hf model, for which we’re using Anyscale Endpoints. Our Python API leverages the “openai” Python package from OpenAI. In fact, it’s a drop-in-replacement for it, given that you set the right API key and endpoint URL as follows:
1import os
2import openai
3
4ANYSCALE_API_ENDPOINT = "https://api.endpoints.anyscale.com/v1"
5openai.api_base = ANYSCALE_API_ENDPOINT
6# Set this env variable to your Anyscale Endpoints API KEY
7openai.api_key = os.environ.get("ANYSCALE_API_KEY")
To query any LLM, we have to craft a prompt and pass it to the LLM. This is the main instruction for the Docu Mentor bot:
1SYSTEM_CONTENT = """You are a helpful assistant.
2Improve the following <content>. Criticise syntax, grammar, punctuation, style, etc.
3Recommend common technical writing knowledge, such as used in Vale
4and the Google developer documentation style guide.
5If the content is good, don't comment on it.
6You can use GitHub-flavored markdown syntax in your answer.
7"""
8
9PROMPT = """Improve this content.
10Don't comment on file names or other meta data, just the actual text.
11The <content> will be in JSON format and contains file name keys and text values. Make sure to give very concise feedback per file.
12"""
We’ve set this instruction up for the system to take file-content input pairs, as this is the natural way to represent changes in pull requests. We’ll take care of dealing with the intricacies of the GitHub API much later. For now, consider the following “mentor” function as the central building block of our app:
1def mentor(
2        content,
3        model="codellama/CodeLlama-34b-Instruct-hf",
4        system_content=SYSTEM_CONTENT,
5        prompt=PROMPT
6    ):
7    result = openai.ChatCompletion.create(
8        model=model,
9        messages=[
10            {"role": "system", "content": system_content},
11            {"role": "user", "content": f"This is the content: {content}. {prompt}"},
12        ],
13        temperature=0,
14    )
15    usage = result.get("usage")
16    prompt_tokens = usage.get("prompt_tokens")
17    completion_tokens = usage.get("completion_tokens")
18    content = result["choices"][0]["message"]["content"]
19
20    return content, model, prompt_tokens, completion_tokens
As you can see, this code snippet is leveraging the OpenAI API, but because we set an Anyscale Endpoints URL and API key, we can query faster and cheaper models such as CodeLlama here.
LinkParallelizing LLM queries efficiently with Ray
We have not explicitly discussed yet what the “content” is that we want to send to the “mentor” function. Our goal is to analyze pull requests. PRs are expressed as differences (“diffs”) between the branch in which you made changes and the base branch that you want to merge your changes to. Normally, a PR touches many files, so it’s natural to analyze diffs per file. Now, if your PR not only changes many files, but also touches many lines of code, naively passing the complete diff as “content” to Docu Mentor will not be a good idea.
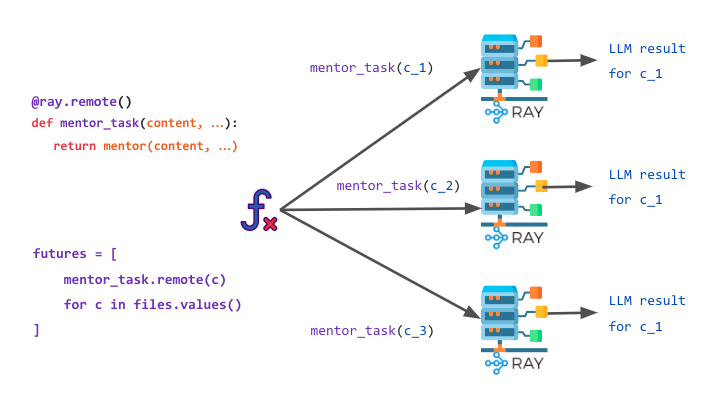
To address this issue, we can instead send one query per file-diff to “mentor” by leveraging Ray. This improves response quality and speed, as the number of input tokens is kept relatively small. We can do this quite easily by first creating a Ray task called “mentor_task” that simply passes through to our previous “mentor” function, by simply adding the “@ray.remote” decorator.
1import ray
2
3@ray.remote
4def mentor_task(content, model, system_content, prompt):
5    return mentor(content, model, system_content, prompt)
With that, we can define a distributed version of “mentor” by calling “mentor_task.remote(content,...)” for per-file content for a PR like this:
1def ray_mentor(
2        content: dict,
3        model="codellama/CodeLlama-34b-Instruct-hf",
4        system_content=SYSTEM_CONTENT,
5        prompt="Improve this content."
6    ):
7    futures = [
8        mentor_task.remote(v, model, system_content, prompt)
9        for v in content.values()
10        ]
11    suggestions = ray.get(futures)
12    content = {k: v[0] for k, v in zip(content.keys(), suggestions)}
13    prompt_tokens = sum(v[2] for v in suggestions)
14    completion_tokens = sum(v[3] for v in suggestions)
15
16    print_content = ""
17    for k, v in content.items():
18        print_content += f"{k}:\n\t\{v}\n\n"
19    logger.info(print_content)
20
21    return print_content, model, prompt_tokens, completion_tokens
Note how “ray_mentor” is just splitting up files and remotely executing “mentor_task” on individual file content. The results then need to be aggregated to fit into a single response that we can write to a GitHub comment. Here’s a visualization of this process:

LinkEvaluating the approach
Before we throw any real user data against our “mentor” query, we have to investigate if using this model and prompt gives us the results we want. But what are realistic expectations for this system, and what makes the answer of our bot good or suitable? After all, we are not aware of any grammar- or style-correcting benchmarks we could test against our system. Human judgment, as is often the case with applications like this, is the ultimate litmus test, but extensive experimentation with human feedback is expensive and impossible to automate – by definition.
An interesting approach that can be fully automated is the following:
Pick the strongest available general-purpose LLM on the market, currently GPT-4.
Use this model to generate a collection of sentences and paragraphs that have grammatical, syntactic, or stylistic deficiencies.
Use this collection as test fixtures to define a set of tests for our bot:
First, run our “mentor” function against this collection and return the results.
Next, use GPT-4 as an evaluator of the results, by asking this stronger LLM if the proposed “mentor” results are considered good.
Run the tests and generate a report that evaluates how much GPT-4 agrees with the results of our bot.
If a certain threshold of agreement (X% of test sentences yield good results) is surpassed, consider the test as passing and the bot as strong enough.

We implemented this approach as unit tests in the docu-mentor GitHub repo. In our experience, GPT-4 can sometimes be overly critical in this scenario. This is why it’s not easy to set a good “agreement” threshold. Frankly speaking, it’s not trivial for two humans to agree on matters of style either. But judging from the results of evaluation, Docu Mentor passes GPT-4’s critical view at least 90% of the time when correcting flawed sentences, and around 70% of the time when considering more complex paragraphs containing stylistic slips. In our opinion, running “mentor” with Llama-2 finds all grave errors, including typos, wrong word orders, incorrect grammar, or just any blatantly wrong formulation, with ease. While GPT-4 sometimes deviates in judgment, we find Docu Mentor to be useful in practice, especially when used as a safeguard that catches 90% of the mistakes you don’t want to have in your docs and codebase.
LinkThe components of our GitHub bot
Now that we’ve discussed the methodology of Docu Mentor in detail, let’s return to building and deploying the actual bot. Before we dive deeper into the code, let’s first give you an overview of what the bot consists of and how we’re going to deploy it.
At its core, building a GitHub app means writing a web application that can handle GitHub Webhooks. That’s ultimately just a service that reacts to events from GitHub (such as “pull request created” or “issue comment updated”).
We build such a service in Python and deploy it in a scalable manner on Anyscale using Ray Serve.
This service handles all business logic and talks to Anyscale Endpoints via the “mentor” function we defined earlier.
We make it so that when you ask the bot for help, a GitHub webhook is triggered. Our Anyscale Service reacts to that hook and generates a response, which it then writes back to the same thread in your pull request by using the GitHub API.
To use the bot, simply talk to it in your pull requests, for instance by saying “@docu-mentor run”. The bot will then simply create a new comment on GitHub that addresses your issues.
The following diagram summarizes this execution plan visually:

LinkHow to implement our bot
Let’s start with a very simple Ray Serve app that uses FastAPI for its API definition. We first define a skeleton that will serve as the basis of our bot. Assuming you’ve installed Ray Serve and FastAPI (e.g. with pip install “fastapi ray[serve]”) and store the following code in a file called “main.py”, you can start a local web service by running the command “serve run main:bot” on localhost:8000:
1async def handle_webhook(request: Request):
2    return {} # This will do all the work
3
4@serve.deployment(route_prefix="/")
5@serve.ingress(app)
6class ServeBot:
7    @app.get("/")
8    async def root(self):
9        return {"message": "Docu Mentor reporting for duty!"}
10
11    @app.post("/webhook/")
12    async def handle_webhook_route(self, request: Request):
13        return await handle_webhook(request)
Our app consists of two routes, the root (“/”) that we’ll simply use for smoke-testing our application, and the “webhook/” route that’s doing all the heavy lifting. To implement the “handle_webhook” function, note that we want our bot to react to two events:
When a new PR gets opened by a user and the bot is installed, we want our bot to let us know of its existence and offer help.
When a user mentions the bot with instructions, we want it to answer in the thread on GitHub directly below the users’ question.
Let’s tackle these steps one after the other.
LinkStep 1: Make your bot offer help
For the purpose of this blog post,we will not worry about authentication and focus on the core application. If you’re interested in that aspect, you can check out how the Docu Mentor GitHub repo, which shows you how to use the GitHub app ID and the private key generated by GitHub to securely generate a JWT token. That token is then used to create a GitHub installation access token, so that Docu Mentor can authenticate as a GitHub app installation on your repos. This makes sure that, when you call “@docu-mentor” commands on a PR, GitHub is actually allowed to send your project information (we need “pull_request” and “issue” access) to the Docu Mentor backend via webhook.
Coming back to the app itself, you can easily figure out if a PR has been opened by checking if “pull_request” is a key in the request data and an “opened” action has been triggered. If that’s the case, we can asynchronously evaluate this incoming request (using the “httpx” library) and write back a greeting to the “issue_url” of the PR.
1import httpx
2import logging
3import os
4
5logging.basicConfig(stream=sys.stdout, level=logging.INFO)
6logger = logging.getLogger("Docu Mentor")
7
8@app.post("/webhook/")
9async def handle_webhook(request: Request):
10    data = await request.json()
11
12    headers = {
13        "Authorization": f"token {installation_access_token}",
14        "User-Agent": "docu-mentor-bot",
15        "Accept": "application/vnd.github.VERSION.diff",
16    }
17
18    # Ensure PR exists and is opened
19    if "pull_request" in data.keys() and (
20        data["action"] in ["opened", "reopened"]
21    ):
22        pr = data.get("pull_request")
23
24        async with httpx.AsyncClient() as client:
25            await client.post(
26                f"{pr['issue_url']}/comments",
27   json={"body": GREETING}, headers=headers
28            )
29
30        return JSONResponse(content={}, status_code=200)
This is the full implementation of the first step!
LinkStep 2: Make the bot analyze your PRs
The next step is slightly more involved and proceeds in the following substeps:
For each webhook event from GitHub, check if an issue was created or edited.
Make sure the issue in question belongs to a PR.
If so, understand if our bot is mentioned in the issue comment body.
If the bot is mentioned in the right way (we implement several commands for it), retrieve all data for the pull request in question.
On demand, the bot should analyze the changes proposed in this PR.
“Docu Mentor” analyzes grammar and style of the writing in your PR, but you can easily imagine a similar bot that criticizes your code as well.
We’re using the LLM “meta-llama/Llama-2-70b-chat-hf” that’s available on Anyscale Endpoints, through our drop-in-replacement OpenAI Python integration.
1# Continuation of the "handle_webhook" function in step 1
2# Check if the event is a new or modified issue comment
3    if "issue" in data.keys() and data.get("action") in ["created", "edited"]:
4        issue = data["issue"]
5
6        # Check if the issue is a pull request
7        if "/pull/" in issue["html_url"]:
8            pr = issue.get("pull_request")
9
10            # Get the comment body
11            comment = data.get("comment")
12            comment_body = comment.get("body")
13
14     # Strip whitespaces
15            comment_body = comment_body.translate(
16                str.maketrans("", "", string.whitespace.replace(" ", ""))
17            )
18
19            # Don't react if the bot talks about itself
20            author_handle = comment["user"]["login"]
21
22      # Check if the bot is mentioned in the comment
23      if (
24                author_handle != "docu-mentor[bot]" and "@docu-mentor run" in comment_body
25            ):
26                async with httpx.AsyncClient() as client:
27                    # Fetch diff from GitHub
28                    url = get_diff_url(pr)
29                    diff_response = await client.get(url, headers=headers)
30                    diff = diff_response.text
31
32                   files_with_lines = parse_diff_to_line_numbers(diff)
33
34         # Get head branch of the PR
35         headers["Accept"] = "application/vnd.github.full+json"
36         head_branch = await get_pr_head_branch(pr, headers)
37
38         # Get files from head branch
39         head_branch_files = await get_branch_files(pr, head_branch, headers)
40
41         # Enrich diff data with context from the head branch.
42         context_files = get_context_from_files(
43             head_branch_files, files_with_lines
44         )
45
46  # Run mentor functionality
47  content, model, prompt_tokens, completion_tokens = \
48      ray_mentor(files) if ray.is_initialized() else mentor(context_files)
49
50                    # Let's comment on the PR issue with the LLM response
51                    await client.post(
52                        f"{comment['issue_url']}/comments",
53                        json={
54                            "body": f":rocket: Docu Mentor finished "
55             + "analysing your PR! :rocket:\n\n"
56                            + "Take a look at your results:\n"
57                            + f"{content}\n\n"
58                            + "This bot is proudly powered by "
59                            + "[Anyscale Endpoints](https://app.endpoints.anyscale.com/).\n"
60                            + f"It used the model {model}, used {prompt_tokens} prompt tokens, "
61             + f"and {completion_tokens} completion tokens in total."
62                        },
63                        headers=headers,
64                    )
Note that, instead of using the diffs of the PR directly, we retrieve context information for it. First, we find the line numbers affected by the pull request and then get the full line from the head branch of the pull request. This is much cleaner, as the raw diffs can be outright useless in certain situations. If a PR just changes one word, we still want Docu Mentor to critique the style of the full sentence containing the word.
In essence, this is the full code used by our bot. We omitted some details about authentication, some helper functions, and nuances about the bot commands, but this is the gist of it. To set the bot up for production, all that’s left is to deploy it on a server and make it available on the GitHub app marketplace. Let’s start with deploying to the Anyscale platform.
LinkDeploying the app on Anyscale
Deploying a Ray Serve app (like the one we just created in “main.py”) on Anyscale is simple and works in three steps:
Set up a new Anyscale Workspace first. In our case, we need the bot source code, and we need to set all credentials (like an Anyscale Endpoints API key). In your workspace, simply run:
1git clone https://github.com/ray-project/docu-mentor.git
2cd docu-mentor
3cp .env_template .env
4# Set all credentials before you continue!
The second step is to define an Anyscale Service YAML file. We already created one in the docu-mentor repo, but put it here for sake of completeness. Essentially, you just need to define a name, the right cluster environment, your dependencies, and the main entrypoint for your Ray Serve app.
1# service.yaml
2name: docu-mentor-bot
3cluster_env: default_cluster_env_2.6.3_py39:1
4ray_serve_config:
5    import_path: main:entrypoint
6    runtime_env:
7        working_dir: .
8        pip: [fastapi, uvicorn, httpx, python-dotenv, openai, pyjwt, cryptography]
9config:
10  access:
11    use_bearer_token: False
The last step is to roll-out the service. If you want to update the Service after initial deployment, simply run the same command again:
1anyscale service rollout -f service.yamlAfter you run this last command, our app will launch as Anyscale Service and you can retrieve its Service URL directly from Anyscale. The very last thing to do is to use this URL to create a GitHub app. We’ll link to the necessary resources directly on GitHub, but will guide you through how it’s done.
LinkRegistering the bot as GitHub app
To make our bot available to the public, and use it on GitHub, we first need to register a new GitHub app. Each app needs a name, ours is “Docu Mentor”. This translates to the following app URL for our bot https://github.com/apps/docu-mentor. In the app settings we need to configure a couple of things:
We have to set an app name, a description, a public Homepage URL (e.g. the link to the GitHub repository of your bot) and most importantly the Webhook URL. This has to be of the form https://<your-anyscale-service-url>/webhook/ to be correct. The webhook must be made “Active”. Make sure to save all changes at the end.
On the general app settings, you can also generate a private key for your app. Do so and download .pem file. Then read out the private key and put it in your .env file in your Anyscale workspace as PRIVATE_KEY.
You will also see your GitHub app ID, which you should store as APP_ID in your .env file.
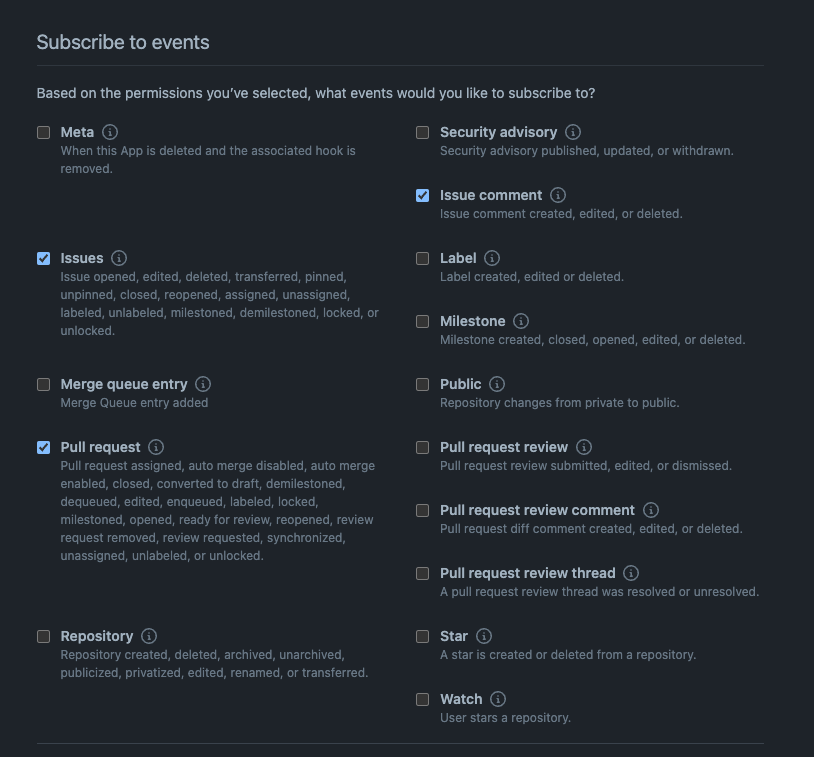
In the “Permissions & events” tab of the app settings, make sure to subscribe to all “Issue”, “Issue comment” and “Pull request” events, as otherwise the bot can’t read and write that information.
Finally, in the “Advanced” section, make the app public.
That’s it! If you follow these steps, you can create an app just like Docu Mentor on your own.

LinkConclusion
In this post, we’ve shown you how to create and deploy your own bots on GitHub. We built Docu Mentor to analyze the writing style in your PRs, but you could use this scaffold to do many other useful things. For example, you could let an LLM analyze weaknesses in your test coverage, or point out issues in your Python programs. If you enjoyed this post and like Docu Mentor, please help us improve it. We’d like to hear from you. In any case, feel free to fork and extend this solution, and share your bots with the community

